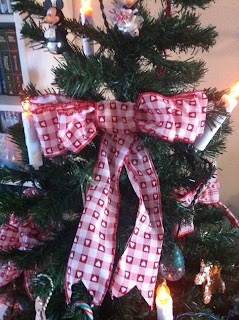
I have used a sewing machine to make my bows this time, however, it could easily be sewn by hand (or even stapled together with a little bit of patience - just staple along the lines I have sewn)
What You Will Need
2.35m (about 7'8") wired ribbon in a festive colour or pattern*
Scissors
Ruler
Sewing Machine with matching colour thread**
A Needle and Thread
*I got my wired ribbon from a craft shop - it's 6cm wide and has a thin wire down each side of the ribbon which means it will hold it's shape. My ribbon is patterned only on the front and the back is plain - if your ribbon is just coloured and not patterned, the photos might help more than the written instructions!.
**My advice would be to use a fairly substantial needle - I think I'm using a size 14 needle - this is because at points you will be sewing through multiple thicknesses of material and wire.
Method
1. Cut your ribbon into 4 pieces of the following lengths:
- 2 x 80cm (side pieces)
- 1 x 20cm (centre piece)
- 1 x 55cm (tail piece)
2. Working with the first of the side pieces, the first step is to make loops - this should be done by folding the ribbon at the following points (as shown in the photograph):

- The first fold is at 15cm from the end (fold the plain sides together)
- The second fold is a further 15cm along (fold the patterned sides together)
- The third fold is a further 13.5cm along (fold the plain sides together)
- The fourth fold a further 13.5cm along (fold the patterned sides together)
- The fifth fold is a further 11.5cm along (fold the plain sides together)
- The final fold is a further 11.5cm along (fold the patterned sides together - this should bring the end of your ribbon to the same point as the beginning).
3. Crease each fold so that the ribbon is flat and sew a straight line along the edge where all the ends/folds meet together.
4. Sew along the edge where the folds are all aligned as shown in the picture
5. Pinch the centre of the line you have just sewn and then flatten the fold, almost like a little pleat. This will make the bow narrower in the centre.
6. Repeat steps 2-6 for the second side piece of ribbon.
7. The next step is to sew the two side pieces together. Overlap them so that you can sew in the middle of the two lines of stitches already there. You should be able to see the bow taking shape.
8. Now we move onto the centre and tail pieces. The tail piece should be folded in half with a little twist so that the patterned sides are both facing the same way.
8. Fold the edges of your centre piece in (this is just so it doesn't need hemming really)
9. Sew the tail onto the centre. You need to keep in mind that the middle of the centre will be placed on the front of the bow, with the tail coming down the middle from the back. Just make sure that this will work by pinning the tail onto the centre piece and then wrapping the centre around the middle of the side pieces. Once you're happy it's in the right place, sew the tail and centre together.
10. Next, sew the tail/centre to the side pieces - attach this to the back and just sew a single line. The result should be like the second photo above - a nearly finished bow with a loose centre coming from underneath, ready to be wrapped over the top.
11. Wrap the rest of the centre piece around the middle and hand sew the two bottom corners on the back to secure it in position. We're nearly there!!
12. To finish the tail pieces, cut a "V" into the bottom. I also just sewed a line of stitches along the bottom to prevent fraying, but you may not need to do this, depending on your ribbon type.
13. "Fluff up" your bow by pushing the ribbon into circular shapes with your fingers. The wires should mean that the bow holds this shape well.
14. Place on your tree!! (You could sew a small piece of satin ribbon to the back to help tie it to the tree if you wanted.) I find that the bows sit between the branches without the need for extra fastenings.
Phew.. that looks like it's much harder work than it is in reality.. it took me much longer to blog it than to make it!


No comments:
Post a Comment